Kava Staking (KAVA)
Kava (KAVA) Staking Guide
The Kava mainnet officially launched on November 15, 2019 at 9 AM EST (14:00 UTC).
What is Kava Lab?
Kava Labs Inc is the company building the Kava DeFi Platform, a blockchain solution providing DeFi services such as stable coins, bonds, and lending to crypto users across many blockchain networks.
Powered by Tendermint consensus, the Kava platform has the ambition to become a reliable, interoperable & fast cross-chain DeFi service.
You can already acquire Kava tokens directly significant exchanges such as Binance.
How to stake Kava tokens?
Kava is a Proof of Stake token based on the Tendermint BFT algorithm. Therefore, it allows every Kava token holder to enjoy staking rewards by delegating their token to a Kava Validator.
In this step-by-step guide, we will explain to you how to delegate your KAVA token by using Cosmostation Wallet or Keplr Wallet. Let’s get started!

Staking your KAVA tokens with Cosmostation Wallet
Create your KAVA wallet on Cosmostation!
Step 1: Download Cosmostation Wallet
Cosmostation Mobile Wallet is available in both iOS and Android. Search “Cosmostation” in Apple Store or Google Play to download and install the application.
iOS: https://apple.co/2IAM3Xm Android: https://bit.ly/2BWex9

Step 2: Create a KAVA wallet
Cosmostation Wallet supports KAVA, Cosmos, IRIS, Binance Chain and etc…. Create your personal KAVA address after opening the application. If you already have a personal KAVA account, simply press “Import” to import your existing mnemonic phrase and load up your wallet.

Press “Create” -> “Kava Mainnet” -> “Show Mnemonics” -> Back up your mnemonic phrase and keep it in a safe place only accessible by you (Important).
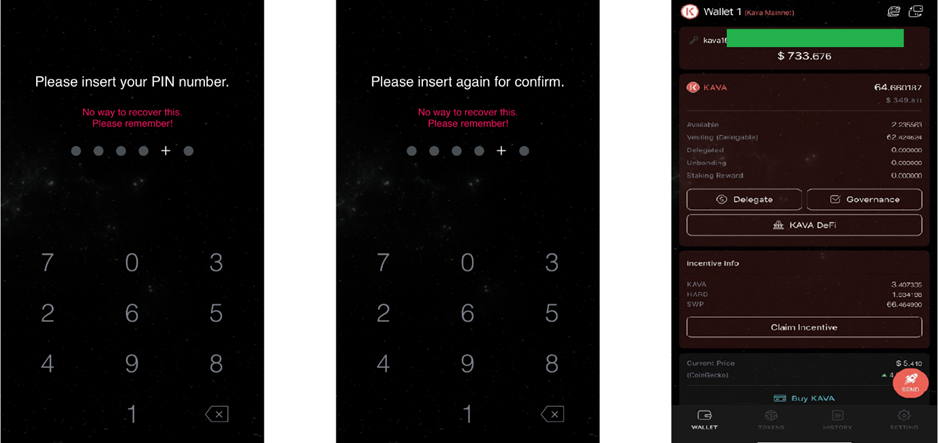
Next, Insert your PIN -> Confirm your PIN -> Your personal KAVA wallet
Please note that there is no way to recover your PIN once you lose it. Cosmostation does not store any user information.
Please remember to keep your generated mnemonic phrase securely in a safe location only accessible to you. Losing your mnemonic phrase can lead to loss of your funds, and there is no way for you to recover them.
Step 3: Deposit KAVA to your address
If you do not have any KAVA in your account, you will need to deposit KAVA to your address to begin making transactions with your account.
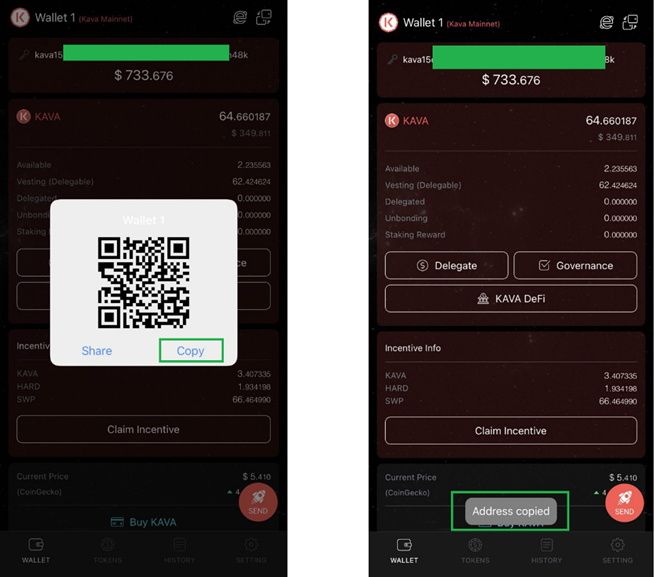
Press the QR code icon on the left of your address -> Press “Copy” to copy your personal KAVA address.
Send KAVA to your personal address from another personal address or from an exchange address.
Please note that Cosmostation Wallet supports KAVA mainnet tokens, and not KAVA BEP tokens (KAVA Mainnet addresses start with “KAVA”). Make sure to check if the wallet you are sending your KAVA from is a KAVA mainnet address.
Step 4: Delegate your KAVA to validators
Now that you have KAVA in your account, you can make delegations to validators of your choice to start earning delegation rewards.
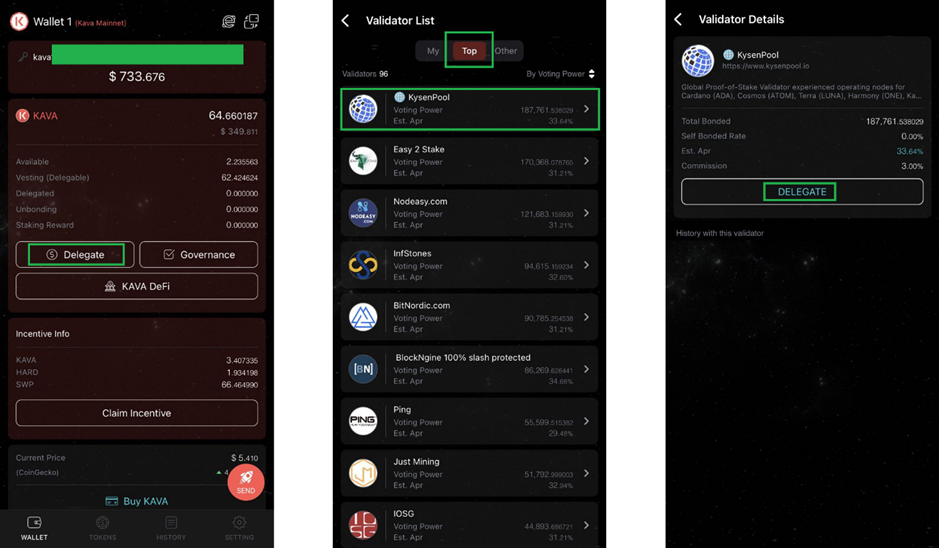
Press the “Delegate” button in the main dashboard -> Press the “Top” tab to view the top 100 validators open for delegation -> Select your favourite validator — say you pick us “KysenPool” and press the “Delegate” button.
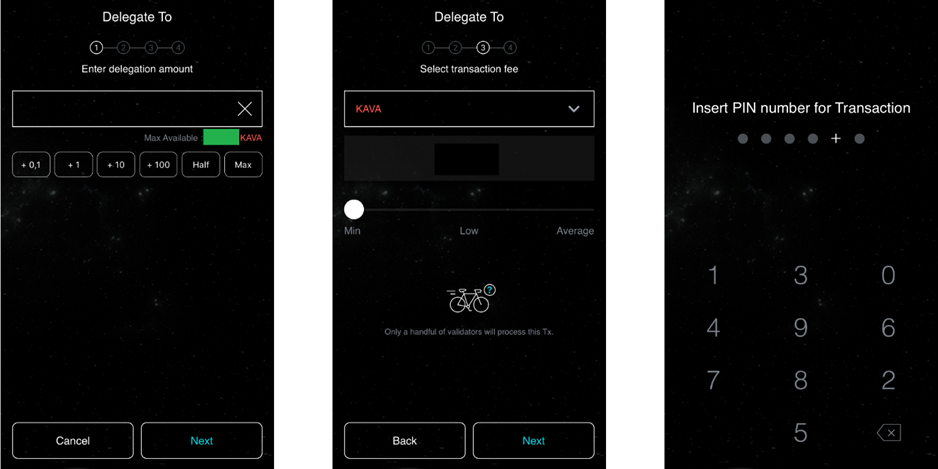
Enter the amount you wish to delegate -> Enter memo (optional) -> Select transaction fee -> Confirm Tx detail -> Enter PIN
Please note that you will not be able to make additional transactions (claim rewards, send, etc.) if you delegate your entire available amount. Make sure to leave a minimal amount of KAVA for transaction fees for future transactions.
Go to the “History” tab in the main dashboard to view your transaction history on Mintscan.
Your total delegated(staked) amount will show up under “delegated” in the main dashboard.
Congratulations! You’ve just delegated KAVA to a validator!

Staking your KAVA tokens with Keplr wallet
Installing Keplr & creating new account
Installing Keplr wallet
1. Go to this link and click the Add button
2. Add “Keplr” window will show off. Here you have to choose Add Extension
3. At the end of the download, you can start to interact with your browser extension by clicking on it.
4. Now you have 4 options: import your account from a compatible* non-custodial wallet, import your Ledger account, create a new account via seed/mnemonic phrase or via One-Click Login. *compatible means a wallet that allows you to use the mnemonic/seed phrase to import your account to Keplr.
Creating wallet
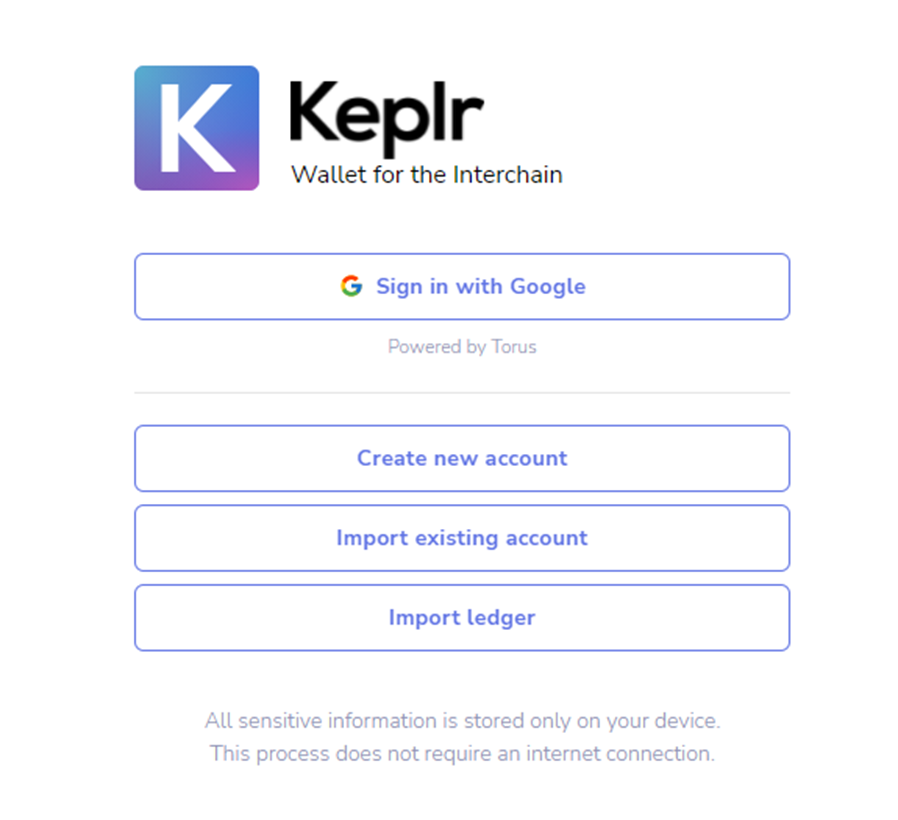
How to create a new Account via Mnemonic/Seed Phrase
1. If you are setting up Keplr for the first time: In the initial pop-up window, choose Create New Account If you have used Keplr before: In the extension click on the silhouette in the upper-right corner, then the blue box Add Account & select Create New Account
2. Choose to have a seed/mnemonic phrase of 24 words, then take care to save them. The safest way is to write the words on paper and store them in a secure place. Avoid taking screenshots of the words or copying them into your computer/phone notes.
3. Now enter a name for your account (you can change it later).
4. You can change the derivation path by clicking on Advanced, but this is optional and not suggested for how we are going to use Keplr. If you are interested in knowing more about the HD wallet derivation path, you can find more in the Keplr FAQ, section General Questions.
5. Once you are sure that you have correctly transcribed the seed/mnemonic phrase, click on Next.
6. To confirm the creation of the new account, all you have to do is click on the words in the right order in which they appear in your seed/mnemonic phrase and press Register.
7. If you have just downloaded Keplr extension, it’s time to set your password! Choose carefully, if possible, prefer a password you’re not using in any other application, and then click Confirm. If you have used Keplr before, this step will be skipped as you have already set your password when creating/importing your first account
How to create a new Account via One-Click Login
1. Note: The suggested path is to create an account via Mnemonic phrase or delegate via Ledger, we describing this procedure only because is the first time it is applied to Cosmos wallets and people might be not familiar with it.
2. Choose the option Sign in with Google
3. Now enter the email/phone number associated with your Google account, its password, and then click Next. In case you don’t have an account yet, you can create one by pressing the create account button.
4. Time to set your Keplr Wallet password! Choose carefully, if possible one password you’re not using in any other application, and then click Confirm
How to Stake KAVA Tokens?
When you are all set it is time to learn how to stake KAVA.
KAVA holders can earn staking rewards, thereby increasing their KAVA holdings by simply staking their KAVA tokens with any one of the active validators on the network.
To stake KAVA tokens you must first buy some KAVA tokens and send them to a wallet that supports staking.
Once you’ve transferred your tokens to a stake-supporting wallet, you may proceed with staking your tokens on the network to earn staking rewards.
First, open your Keplr extension and press Stake
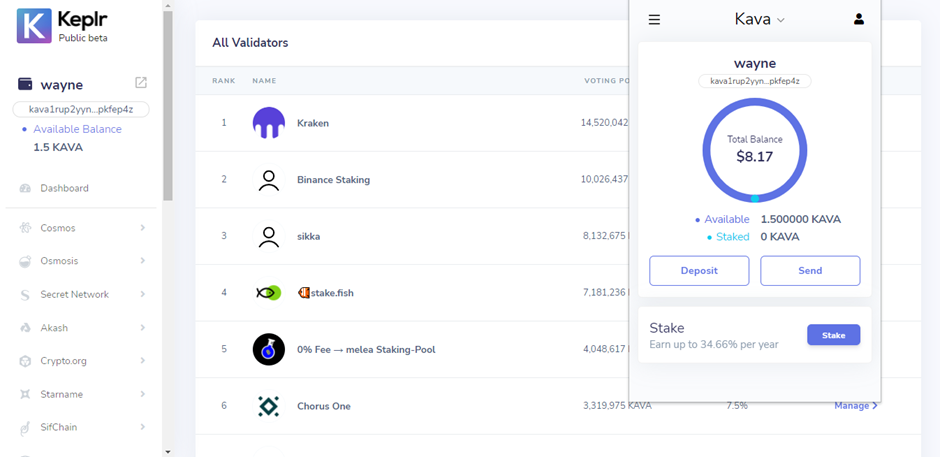
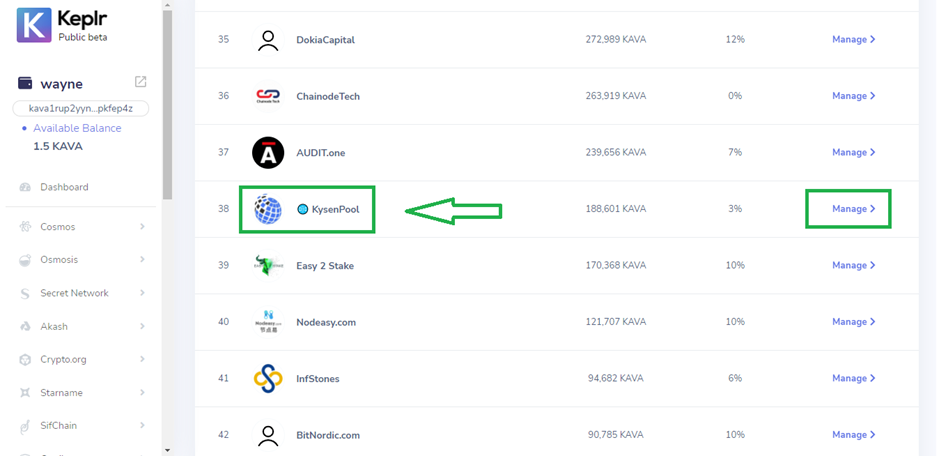
Stack buttonSelect a validator of your choice to delegate your tokens to — say you pick us KysenPool.
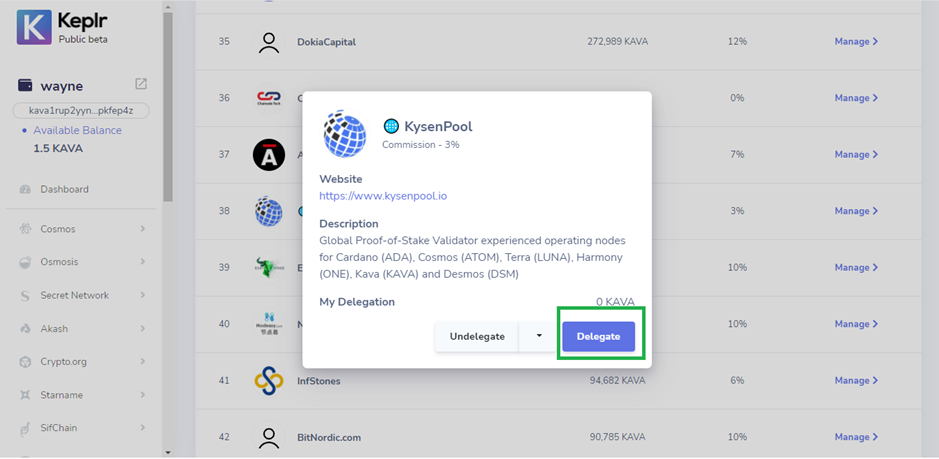
Once you have made your decision of validator, click Manage, then Delegate.
Next step is to decide the number of KAVA tokens you want to delegate, press Delegate.
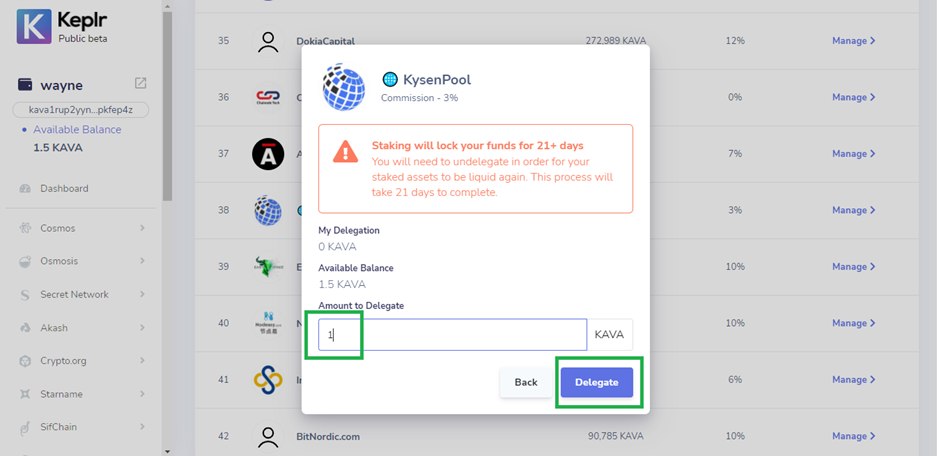
Type the decided amount in the input field and click Delegate.
Next, select the transaction fee from the range of fees on display.
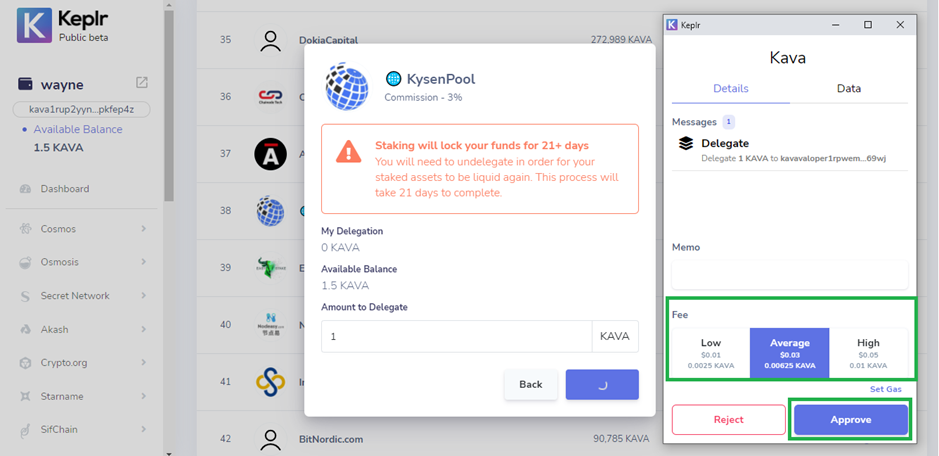
Memo field is optional. You may leave it empty until you are not sending your tokens to an exchangeClick on Approve to confirm your transaction.
You have now staked your KAVA tokens and will begin earning staking rewards!
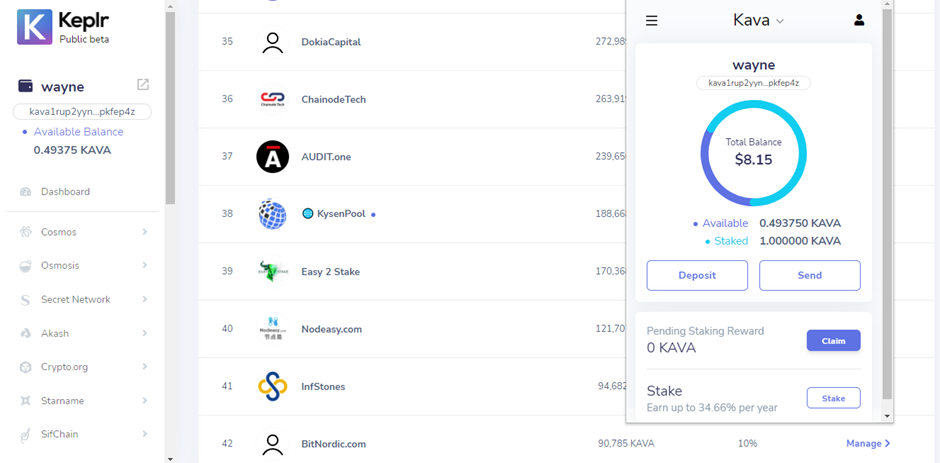
Congratulations! You’ve just delegated KAVA to a validator!
Stake Now with KysenPool 👉 Keplr Wallet App
Thank you for reading!!!
We strive to build your trust with our technical diligence while helping support the KAVA blockchain network by staking your KAVA tokens while earning rewards!
If you have any questions,
please feel free to ask us directly in our 👇Telegram👇. https://t.me/kysenpool
About Us
🌐 KysenPool Validator
Unlock the Power of Staking with Our Trusted Blockchain Infrastructure Services!
We aim to decentralize the Proof-of-Stake blockchain ecosystem by providing high-performance validation, infrastructure, and automation. Our expertise spans Tendermint-based chains like Cosmos, Kava, Agoric, and Aura; Ethereum and EVM chains such as Harmony; as well as substrate-based ecosystems like Cardano and Midnight. We’re also actively engaged with next-generation networks including Lido SSV, Story Protocol, Sahara AI, Bitway, Pell Network, Imua, and Canopy. Our global team continuously enhances automation and proactively monitors operations to ensure high availability, resilience, and optimal performance across all supported networks.
Our infrastructure is a hybrid of data centers bolstered with Hardware Security Modules (HSMs), and distributed globally at multiple Cloud providers. Our mission is to help provide a sound infrastructure, share toolings and offer foundational services, so that token holders can stake with confidence while the blockchain ecosystems which we support continues to strengthen. We hope you like our contributions into the ecosystems that we support. To find out more about networks that we support, checkout our website below.
Stake with KysenPool
on Story via Staking Explorer
on Cardano visible at PoolTool via our Staking Guide
on Cosmos via Keplr Wallet
on Agoric via Keplr Wallet
on Harmony via Staking Explorer (upon sign-in)
on Kava via Keplr Wallet
on Aura at AuraScan
Our Dapps
Cosmos Outpost (Analytics): https://cosmosoutpost.io/
Official Channels
Email: [email protected]
Website: https://kysenpool.io/
Twitter: https://twitter.com/kysenpool
Telegram: https://t.me/kysenpool
Medium: https://medium.com/kysenpool
Last updated